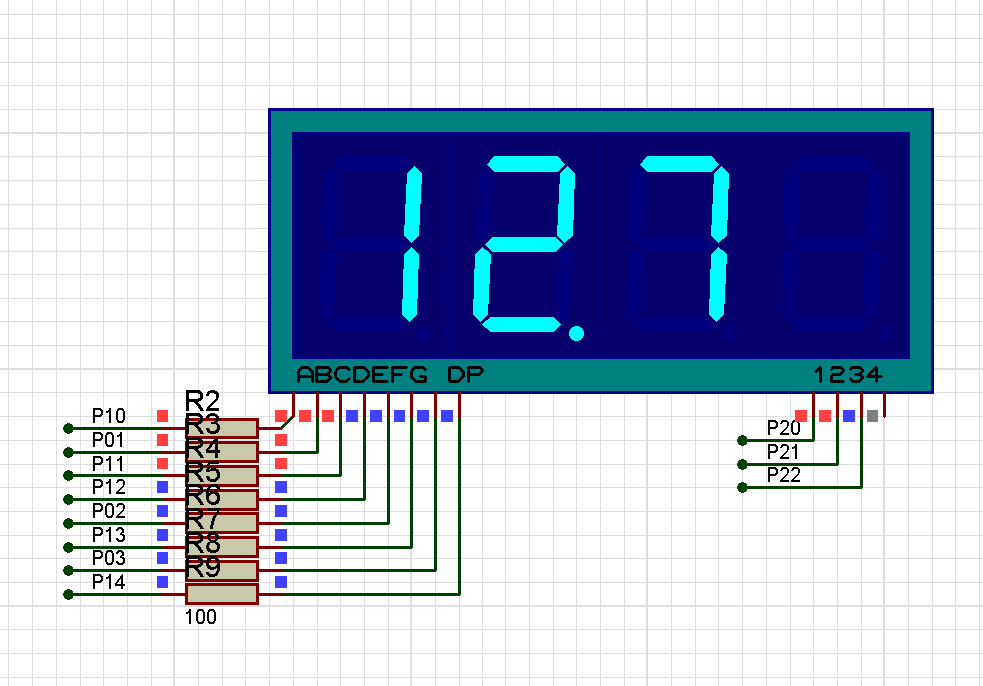
此程序可使用不同P口的任意单片机引脚驱动数码管显示。包含程序和仿真,仿真已验证OK。
分享给各位学习参考。

单片机源程序如下:
- #include "reg51.h"
- #define uchar unsigned char //重命名关键字
- #define uint unsigned int //重命名关键字
- sbit K1=P3^0; //开始/暂停
- sbit K2=P3^1; //复位
- sbit GPIO_A=P1^0; //数据端a
- sbit GPIO_B=P0^1; //数据端b
- sbit GPIO_C=P1^1; //数据端c
- sbit GPIO_D=P1^2; //数据端d
- sbit GPIO_E=P0^2; //数据端e
- sbit GPIO_F=P1^3; //数据端f
- sbit GPIO_G=P0^3; //数据端g
- sbit GPIO_H=P1^4; //数据端dp
- sbit L1=P2^0; //数码管1位选
- sbit L2=P2^1; //数码管2位选
- sbit L3=P2^2; //数码管3位选
- unsigned char code DIG_CODE[10] = {0,1,2,3,4,5,6,7,8,9};
- //0、1、2、3、4、5、6、7、8、9的显示码
- unsigned char DisplayData[3];
- //用来存放要显示的3位数的值
- uchar i,Key_Flag_Idx; //定义变量
- uint Second_Counts; //定义变量
- bit Key_State; //定义变量
- void DelayMS(uint ms) //延时子函数
- {
- uchar t; //定义变量
- while(ms--)
- for(t=0;t<120;t++);
- }
- void DuanXuan(unsigned char dat) //发送段码0~9
- {
- if(dat==0)
- {GPIO_H=0;GPIO_G=0;GPIO_F=1;GPIO_E=1;GPIO_D=1;GPIO_C=1;GPIO_B=1;GPIO_A=1;} //'0'
- if(dat==1)
- {GPIO_H=0;GPIO_G=0;GPIO_F=0;GPIO_E=0;GPIO_D=0;GPIO_C=1;GPIO_B=1;GPIO_A=0;} //'1'
- if(dat==2)
- {GPIO_H=0;GPIO_G=1;GPIO_F=0;GPIO_E=1;GPIO_D=1;GPIO_C=0;GPIO_B=1;GPIO_A=1;} //'2'
- if(dat==3)
- {GPIO_H=0;GPIO_G=1;GPIO_F=0;GPIO_E=0;GPIO_D=1;GPIO_C=1;GPIO_B=1;GPIO_A=1;} //'3'
- if(dat==4)
- {GPIO_H=0;GPIO_G=1;GPIO_F=1;GPIO_E=0;GPIO_D=0;GPIO_C=1;GPIO_B=1;GPIO_A=0;} //'4'
- if(dat==5)
- {GPIO_H=0;GPIO_G=1;GPIO_F=1;GPIO_E=0;GPIO_D=1;GPIO_C=1;GPIO_B=0;GPIO_A=1;} //'5'
- if(dat==6)
- {GPIO_H=0;GPIO_G=1;GPIO_F=1;GPIO_E=1;GPIO_D=1;GPIO_C=1;GPIO_B=0;GPIO_A=1;} //'6'
- if(dat==7)
- {GPIO_H=0;GPIO_G=0;GPIO_F=0;GPIO_E=0;GPIO_D=0;GPIO_C=1;GPIO_B=1;GPIO_A=1;} //'7'
- if(dat==8)
- {GPIO_H=0;GPIO_G=1;GPIO_F=1;GPIO_E=1;GPIO_D=1;GPIO_C=1;GPIO_B=1;GPIO_A=1;} //'8'
- if(dat==9)
- {GPIO_H=0;GPIO_G=1;GPIO_F=1;GPIO_E=0;GPIO_D=1;GPIO_C=1;GPIO_B=1;GPIO_A=1;} //'9'
- if(dat==10)
- {GPIO_H=0;GPIO_G=0;GPIO_F=0;GPIO_E=0;GPIO_D=0;GPIO_C=0;GPIO_B=0;GPIO_A=0;} //全灭
- }
- void DuanXuan2(unsigned char dat) //发送段码0.~9.
- {
- if(dat==0)
- {GPIO_H=1;GPIO_G=0;GPIO_F=1;GPIO_E=1;GPIO_D=1;GPIO_C=1;GPIO_B=1;GPIO_A=1;} //'0.'
- if(dat==1)
- {GPIO_H=1;GPIO_G=0;GPIO_F=0;GPIO_E=0;GPIO_D=0;GPIO_C=1;GPIO_B=1;GPIO_A=0;} //'1.'
- if(dat==2)
- {GPIO_H=1;GPIO_G=1;GPIO_F=0;GPIO_E=1;GPIO_D=1;GPIO_C=0;GPIO_B=1;GPIO_A=1;} //'2.'
- if(dat==3)
- {GPIO_H=1;GPIO_G=1;GPIO_F=0;GPIO_E=0;GPIO_D=1;GPIO_C=1;GPIO_B=1;GPIO_A=1;} //'3.'
- if(dat==4)
- {GPIO_H=1;GPIO_G=1;GPIO_F=1;GPIO_E=0;GPIO_D=0;GPIO_C=1;GPIO_B=1;GPIO_A=0;} //'4.'
- if(dat==5)
- {GPIO_H=1;GPIO_G=1;GPIO_F=1;GPIO_E=0;GPIO_D=1;GPIO_C=1;GPIO_B=0;GPIO_A=1;} //'5.'
- if(dat==6)
- {GPIO_H=1;GPIO_G=1;GPIO_F=1;GPIO_E=1;GPIO_D=1;GPIO_C=1;GPIO_B=0;GPIO_A=1;} //'6.'
- if(dat==7)
- {GPIO_H=1;GPIO_G=0;GPIO_F=0;GPIO_E=0;GPIO_D=0;GPIO_C=1;GPIO_B=1;GPIO_A=1;} //'7.'
- if(dat==8)
- {GPIO_H=1;GPIO_G=1;GPIO_F=1;GPIO_E=1;GPIO_D=1;GPIO_C=1;GPIO_B=1;GPIO_A=1;} //'8.'
- if(dat==9)
- {GPIO_H=1;GPIO_G=1;GPIO_F=1;GPIO_E=0;GPIO_D=1;GPIO_C=1;GPIO_B=1;GPIO_A=1;} //'9.'
- }
- void DigDisplay() //数码管显示子函数
- {
- unsigned int j; //定义变量
- L1=0; //位选
- DuanXuan(DisplayData[0]);//发送段码
- j = 100; //扫描间隔时间设定
- while(j--);
- L1=1; //消隐
- L2=0; //位选
- DuanXuan2(DisplayData[1]);//发送段码
- j = 100; //扫描间隔时间设定
- while(j--);
- L2=1;
- L3=0; //位选
- DuanXuan(DisplayData[2]); //发送段码
- j = 100; //扫描间隔时间设定
- while(j--);
- L3=1;
- }
- void Key_Event_Handle() //处理按键事件
- {
- if(Key_State==0)
- {
- Key_Flag_Idx=(Key_Flag_Idx+1)%2; //让变量Key_Flag_Idx保持在小于2的值
- switch(Key_Flag_Idx)
- {
- case 1:
- ET0=1;
- TR0=1; //开启定时器
- break;
- case 0:
- ET0=0;
- TR0=0; //关闭定时器
- break;
- }
- }
- }
- void main()
- {
- DuanXuan(10);
-
- TMOD=0x01; //定时器0方式1
- TH0=(65536-50000)/256; //定时器0:50ms
- TL0=(65536-50000)%256;
- EA=1;
- while (1)
- {
- if(Key_State!=K1) //开始按键按下时
- {
- DelayMS(10); //按键去抖
- Key_State=K1;
- Key_Event_Handle(); //执行按键处理函数
- }
- if(K2==0) //复位按键按下时
- {
- ET0=0;
- TR0=0; //关闭定时器
- i=0; //清零计数
- Second_Counts=0; //清零秒
- Key_Flag_Idx=0;
- }
- DisplayData[0] = DIG_CODE[Second_Counts/100%10]; //显示百位
- DisplayData[1] = DIG_CODE[Second_Counts/10%10]; //显示十位
- DisplayData[2] = DIG_CODE[Second_Counts%10]; //显示个位
- DigDisplay(); //执行数码管显示函数
- }
- }
- //T0中断函数
- ……………………
- …………限于本文篇幅 余下代码请从51黑下载附件…………
所有资料51hei提供下载:
 不同P口数码管显示.zip
(87.99 KB, 下载次数: 38)
|