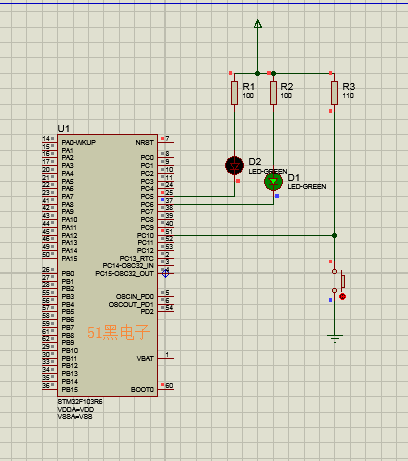
仿真原理图如下(proteus仿真工程文件可到本帖附件中下载)

本程序以stm32f10x为核心
#include"stm32f10x.h"
voidGPIO_Config(void);
intmain(void)
{
int i;
GPIO_Config();
GPIO_SetBits(GPIOC, GPIO_Pin_5);
GPIO_ResetBits(GPIOC, GPIO_Pin_6);
while(1)
{
if(GPIO_ReadInputDataBit(GPIOC,GPIO_Pin_10)==0)
{
for(i=0;i<500;i++){}
if(GPIO_ReadInputDataBit(GPIOC,GPIO_Pin_10)==0)
{
GPIO_WriteBit( GPIOC,GPIO_Pin_5, (BitAction)(1 - GPIO_ReadOutputDataBit( GPIOC, GPIO_Pin_5 )));
GPIO_WriteBit( GPIOC,GPIO_Pin_6, (BitAction)(1 - GPIO_ReadOutputDataBit( GPIOC, GPIO_Pin_6 )));
while(GPIO_ReadInputDataBit(GPIOC,GPIO_Pin_10)==0);
}
}
}
}
voidGPIO_Config(void)
{
GPIO_InitTypeDef GPIO_InitStructure;
RCC_APB2PeriphClockCmd(RCC_APB2Periph_GPIOC,ENABLE) ;
GPIO_InitStructure.GPIO_Speed=GPIO_Speed_50MHz;
GPIO_InitStructure.GPIO_Mode=GPIO_Mode_Out_PP;
GPIO_InitStructure.GPIO_Pin=GPIO_Pin_6|GPIO_Pin_5;
GPIO_Init(GPIOC,&GPIO_InitStructure);
GPIO_InitStructure.GPIO_Pin=GPIO_Pin_10;
GPIO_InitStructure.GPIO_Mode=GPIO_Mode_IPU;
GPIO_Init(GPIOC,&GPIO_InitStructure);
整个工程文件及仿真图见附件
 d.7z
(60.48 KB, 下载次数: 24)
|